
Create Onboarding Flows
How to Create Onboarding Flows
NonprofitsHQ includes powerful Onboarding Flows to ensure your staff, volunteers, and board members are onboarded correctly and consistently.
Our intuitive onboarding builder allows you to collect key information, require training videos, and automate approvals - all within your NonprofitsHQ dashboard.
With customizable steps and forms, you can tailor each onboarding experience to match your organization’s needs, ensuring every new team member starts with the right training, documentation, and expectations.
Creating a Flow
Creating an onboarding flow for a specific contact type is simple and can be completed in just a few minutes.
With NonprofitsHQ’s intuitive Onboarding Flow Editor, you can design a seamless experience that collects the right information from your staff, volunteers, or board members during their onboarding process.
From training videos and policy forms to digital signatures and approval steps - everything is built to ensure consistency, compliance, and a great first impression.
To get started:
-
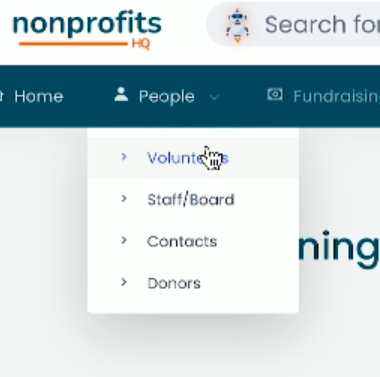
From the main dashboard navigation, hover over People and select either Volunteers or Staff, depending on which onboarding flow you’d like to create.
This will take you to the contact management area where you can view, manage, and onboard members of that specific group.
-
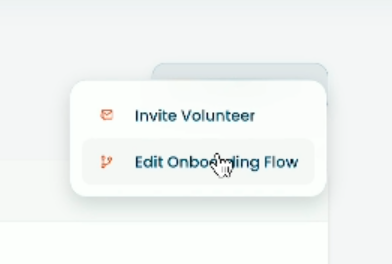
In the top-right corner of the page, click Actions, then select Edit Onboarding Flow.
This will open the Onboarding Flow Editor, where you can customize each step of the onboarding process for your selected contact type.

⚠️ Note: If you do not see People in the top-level navigation, or Volunteers in the sub-navigation, you may not have the required permissions to access this area.
Check with your organization’s administrator to confirm that your account has the correct permissions.
Add Components to Your Flow
You will now see the Onboarding Flow Builder.
This tool allows you to define the steps required for your staff, volunteers, or board members to successfully complete onboarding for your organization.
Each step can include training materials, forms, or approvals - giving you full control over how your onboarding process is structured and tracked.

To add a new step to your onboarding flow, simply click the step type you’d like to include and complete the required options.
-
Video: Requires the user to watch a video before progressing to the next step. Include a title and description — both are visible to the user during onboarding and help provide context for the training material.
-
Form: Used to collect information from the user during onboarding. Forms are created in the Marketing → Forms section of your dashboard and can include custom fields, signatures, and required acknowledgments.
- Final Approval: Requires your organization to review and approve a new volunteer or staff member before their account becomes active. Anyone with the Administrator role or the
manage_onboarding_flowpermission can approve or reject onboarding completions.
Once your steps are configured, click Save & Publish. You now have a custom onboarding flow for your selected contact type.
Each time a new user is added, they’ll be automatically enrolled in the appropriate onboarding flow and guided through each step.
Approve an Onboarding
Once a user has completed all onboarding requirements for your organization, you can approve or reject their activation within your NonprofitsHQ account.
To view users currently in the onboarding process:
- Hover over the People navigation item.
-
Click either Volunteers or Staff, depending on the contact type.

Once the page loads, click the Onboarding tab.
This section displays a list of all users currently in the onboarding process — including those who may be awaiting approval before activation.
From here, you can quickly see each contact’s progress, review their submitted steps, and take action to approve or reject their onboarding as needed.

Click on a contact record to open their detailed onboarding status.
Here, you’ll see the individual steps they’ve completed, any forms or videos they’ve viewed, and their overall progress toward completion.
This view also provides access to approval or rejection actions once all onboarding requirements have been met.

You can view the status and any submitted information for each step of the onboarding process by clicking the appropriate buttons or links within the contact’s onboarding view.
When you’re ready to take action:
- Click Approve or Reject to complete the onboarding process.
-
In the confirmation window, click Confirm Approval (or Confirm Rejection) to finalize your decision.
Once approved, the contact’s account will be activated and they’ll gain access to your organization’s NonprofitsHQ portal.
If rejected, they’ll be notified and can review the reason or make updates before resubmitting.

Note: If you reject an onboarding, you’ll be required to provide a reason for rejection. This message will be visible to the user so they understand what needs to be corrected before resubmitting their onboarding.
That's all!
You now know how to create and approve an onboarding for your organization on NonprofitsHQ.
This is just one of the many powerful tools included with NonprofitsHQ - all at no extra cost. With everything built in, you can focus on what matters most: engaging your community and driving your mission forward.
If you run into any trouble or need any additional support, please reach out to your account manager if you have one, or email our support team directly via help@nonprofitshq.com